The Amplifi HD Router, launched around 2016 was a preferred device among many, both home users and offices. Coupled with the mesh points, it could provide reliable and stable internet via WiFi to a larger area. Recently, a commit to the OpenWrt Git added OpenWrt support for Amplifi HD. This means we can now install OpenWrt OS on Amplifi HD. Now, what this means and what this entails has been covered in detail in this article. So, keep reading.
UPDATE (11th February, 2025): Restore original firmware on Amplifi HD using the backup.
What is OpenWrt?
The official OpenWrt page says:-
The OpenWrt Project is a Linux operating system targeting embedded devices. Instead of trying to create a single, static firmware, OpenWrt provides a fully writable filesystem with package management. This frees you from the application selection and configuration provided by the vendor and allows you to customize the device through the use of packages to suit any application. For developers, OpenWrt is the framework to build an application without having to build a complete firmware around it; for users this means the ability for full customization, to use the device in ways never envisioned.
To put it in layman’s terms, it opens up your router to more possibilities. OpenWrt, being opensource and maintained by community of developers is constantly updated. This means you get security updates regularly, if you are on the latest version of OpenWrt. This becomes specially important for routers that have stopped getting updates from their manufacturers. But, let me add something here – Amplifi HD is still receiving updates from the manufacturer, Ubiquiti. At the time of writing this article (25th October, 2024), the last update (v4.0.3) was released on 13th May, 2024.
Moreover, the OS uses the Opkg package manager, which lets you install additional applications, subject to the free storage available on the router (routers aren’t exactly known to be great storage devices). But, this does enable you to add features to the router, the official OS wouldn’t allow you to. For example, it’s easier to setup a Mesh with multiple routers using OpenWrt.
OpenWrt on Amplifi HD Router
Disclaimer
Neither me, nor PS4Linux.com, blog.compardre.com or anybody mentioned in this article (We) is responsible for any damages you face due to following the instructions or using OpenWrt or related packages on your router. Carefully look into local or regional laws before installing/using OpenWrt on your router, as many regions do have restrictions, sometimes legal, in place. OpenWrt opens up your router to many possibilities, some of which may be considered illegal in some areas. We are not responsible for anything that happens due to usage of OpenWrt by You and do not provide any guarantee or warranty in regards to anything in this article or its pages. You proceed at your own risk!
Development of OpenWrt on Amplifi HD Router
It all began with alexanderhenne’s GitHub Repository, outlining the J11 headers on one of the Amplifi HD boards. This opened up the possibility of running a serial connection to the router using 3 wires, translating to better understanding of the original OS on the router, and the ability to control and customise the router. Apart from the ability to run UART on Amplifi HD, this repository enables the user to make and flash their own custom firmware on the router.
Later, on 25th May, 2024, a commit was added to the official OpenWrt GitHub repository by skramstad, adding OpenWrt support for Amplifi HD for the first time. The commit does come with the set of instructions to get OpenWrt running on Amplifi HD, though it was especially aimed at developers.
A few months later, StephanAAU added a GitHub Gist, detailing the steps to get OpenWrt working on Amplifi HD. He was able to correct a mistake in the pin diagram on alexanderhenne’s repository and also a minor update to the tftpboot command seen on skramstad’s commit. He also added additional steps for people who might be facing issues running OpenWrt post installation.
All in all, if not for alexanderhenne, skramstad and StephanAAU, this tutorial won’t have been possible. So, all credits and a huge thanks to them!
Status of OpenWrt on Amplifi HD
skramstad’s commit does specify that the display and LED on the Amplifi HD Router doesn’t work on OpenWrt. I also heard no sound from the speaker while on OpenWrt, but at this point, I am unsure, if speakers just lack setting up. Will update on this, if something comes up.
Video Tutorial: Install & setup OpenWrt on Amplifi HD
If you prefer textual tutorials, keep reading.
How to install & setup OpenWrt on Amplifi HD?
Since we now have a good idea about what OpenWrt on Amplifi means, let us look into the installation and setup part. In this tutorial, we will be covering the Amplifi HD disassembly process, J11 UART setup, backing up original firmware, OpenWrt installation & setup. Given you followed this guide to backup your original firmware, you can also easily revert to the original firmware. A tutorial on the same is coming soon.
First, let us cover the requirements.
Requirements
- Amplifi HD Router (Buy Now/Also check your local market)
- Mini USB to TTL (Buy Now – US (Intl)/IN) with appropriate USB cable.
- N.B. Added links for Mini USB to TTL readers, as they are cheaper. Buy Type-C or microUSB, if that’s what you prefer. Some of these might be plug & play, while others might need drivers. Check reviews before buying.
- Male to female jumper wires (optional) (Buy Now – US (Intl)/IN) – One side has to be soldered
- Soldering iron, flux & lead (Buy Now – US (Intl)/IN)
- Prying tools (Buy Now – US (Intl)/IN)
- N.B. If you don’t care about the cosmetics of the router much, a flat head screwdriver might be enough.
- 64-bit Windows (preferably Windows 10/11)
- OpenSSH Server (Download OpenSSH-Win64.zip here)
- OpenWrt firmware for Amplifi HD
- Putty (Download here)
- WinMD5 (Download here)
- TFTPD64 (Download here and install it)
Now that we are all set on the Requirements front, let us quickly begin the installation and setup process. For ease, I have divided the whole tutorial into a few parts.
Part 1. Disassembly & UART header setup
Step 1. Disassemble Amplifi HD
Unlike most other electronics, Amplifi HD doesn’t use screws. It is comprised of 3 electronic boards housed into a plastic housing compartment which also houses the display board and the speakers. So, to disassemble the router you have to go from the downside. To help you with it, I have got some images along with the instructions.
- Unplug the router from the wall and unplug any cables/devices connected to it.
- Pick a side and start prying between the translucent base at the bottom and the white plastic housing above it. Insert the prying tool at the middle of the side. Pry upwards in the beginning until you reach a white plastic shield which is actually on top of the translucent base. You will soon find that the white plastic housing on top is actually 2 or 3 layered (check the image below). So, make sure your prying tool is bypassing the layers and going deeper to get to the groove.
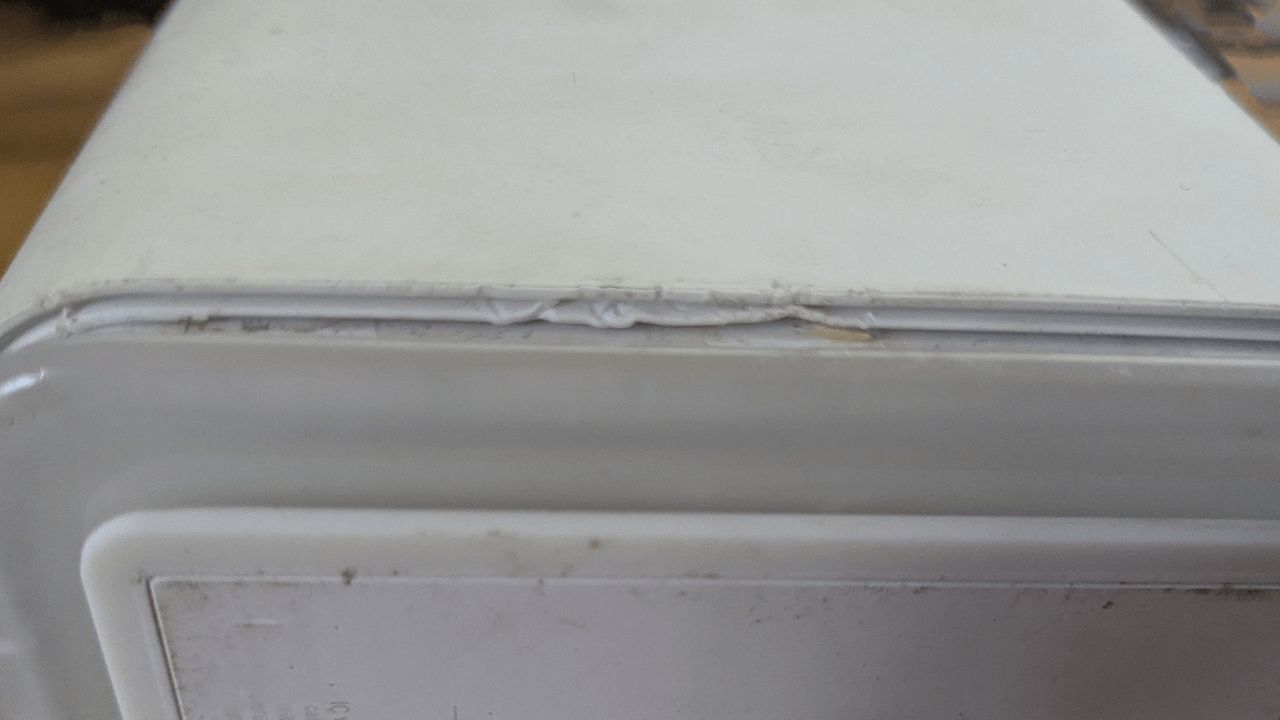
- Once you reach the inner white plastic shield, wiggle a little until you see/feel a groove. After you hit the groove, pry downwards against the translucent base, such that the white housing on top becomes separated from the translucent base. Check the small animation (GIF) below for assistance.
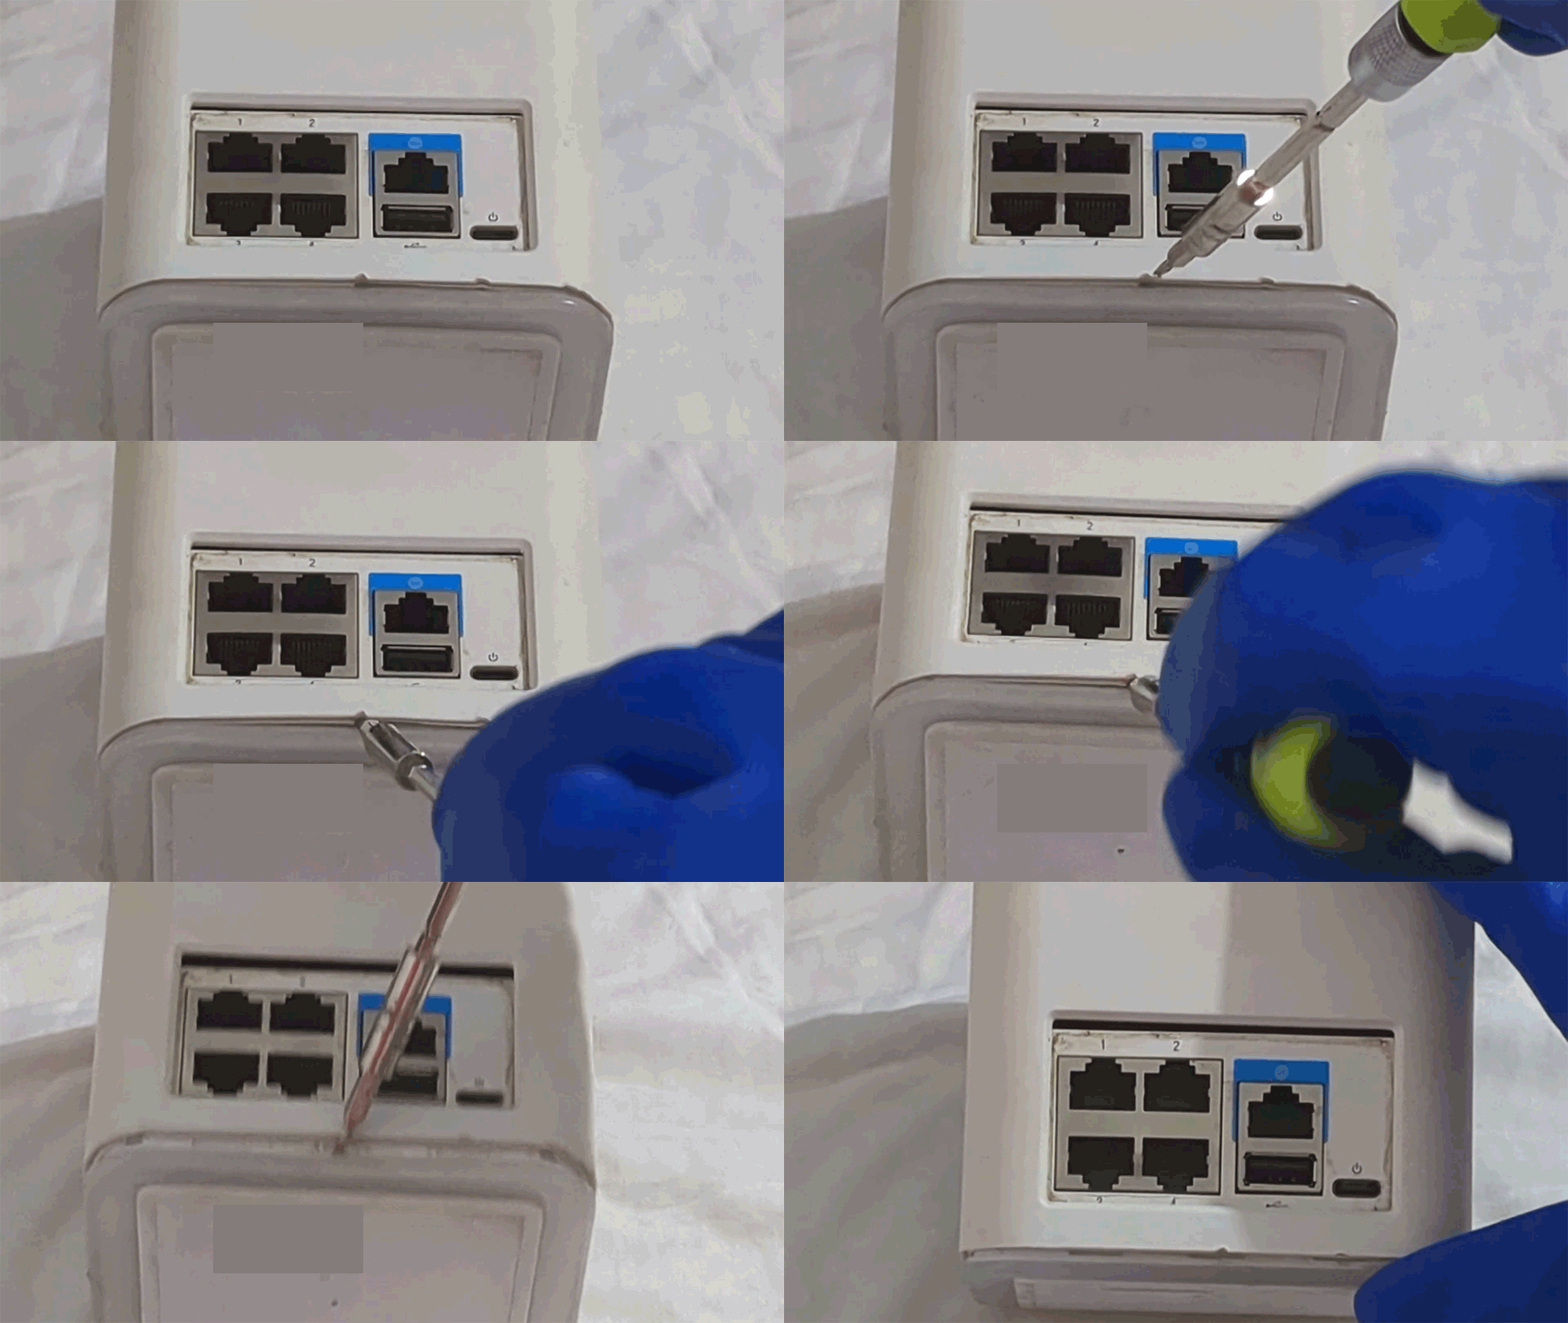
- Repeat the same for the remaining 3 sides till you have a generous gap between the translucent base and the white plastic housing on top.
- Use your hands to pull the housing apart. If you get stuck, use the prying tool for help. Do NOT blindly apply force. Remember, there is a wire connecting the bottom board to the display and speakers. We don’t want to rip that. This is what it looks like after some pulling:-
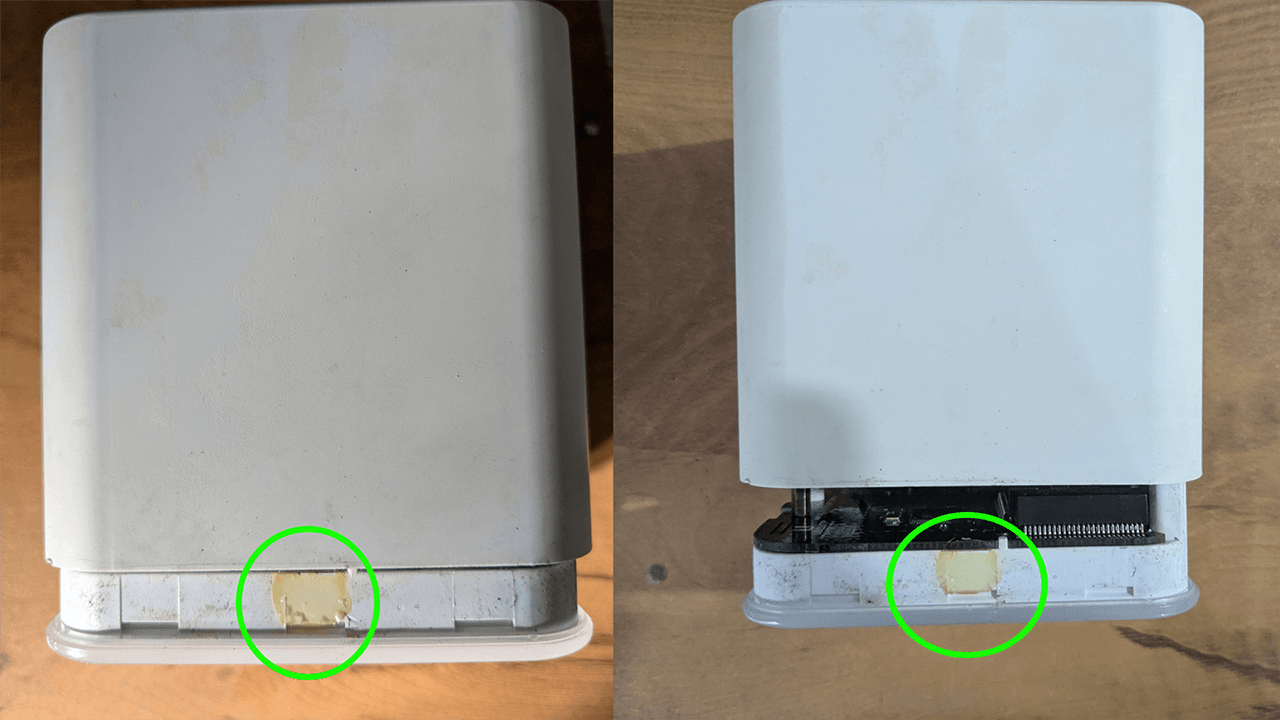
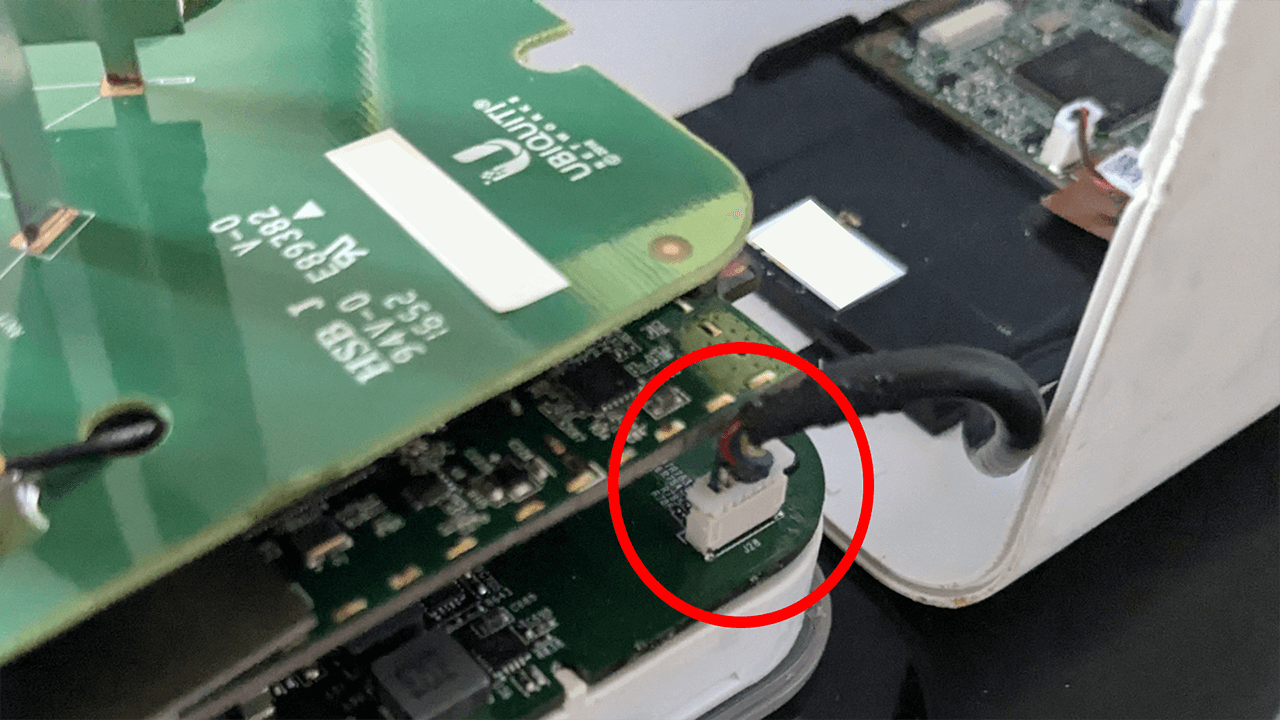
- Once the white housing is relatively free from the translucent base, gently separate them and look for the wire going into the bottom board that I mentioned above (check the image below). At this stage, you may want to remove the pull tab connecting this wire to the bottom board. It’s easy if you have “raccoon-like hands” (nod to the greatest technician that’s ever lived).
- Now, you can work freely with the three boards.
- The top board is connected to the middle board using 3 screws and a few heavily glued in, mini co-axial cables, as in the image below. So, the top and middle boards shouldn’t be completely separated. Anyways, unscrew the top board.
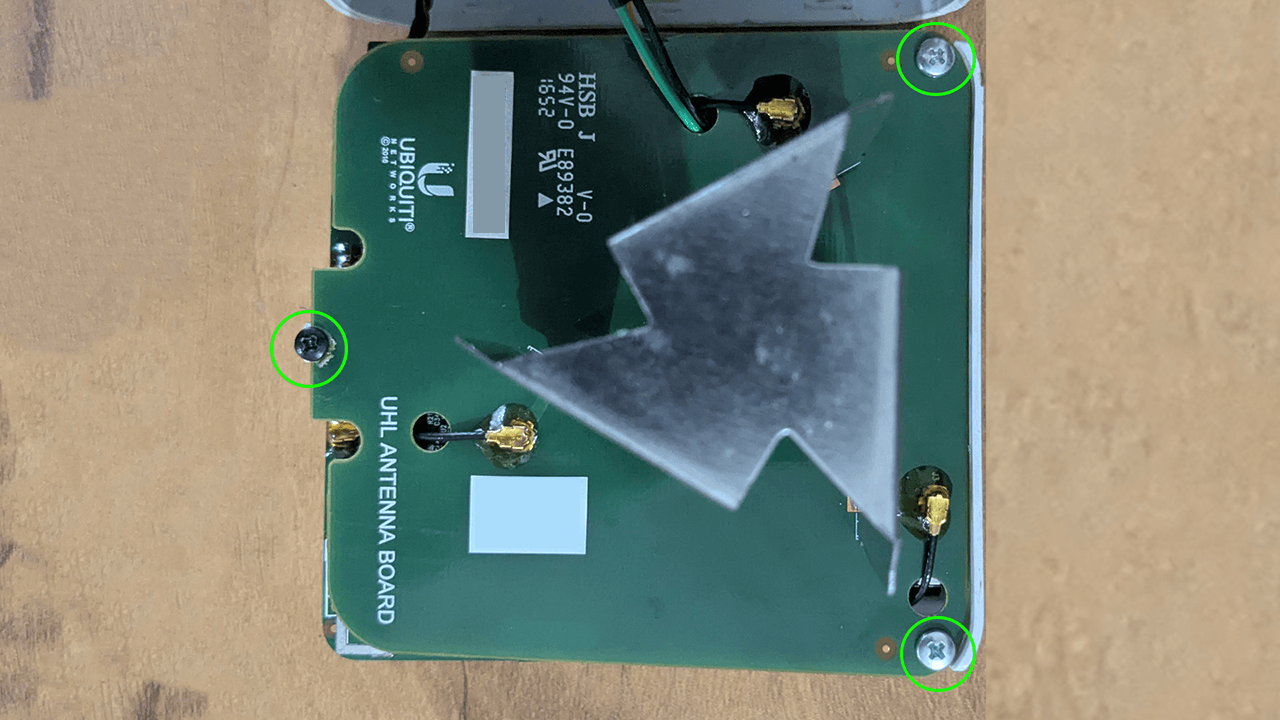
- Move the top board away from the middle board in a direction that the glued-in cables allow. Though these are heavily glued in strong cables, it’s advised not to subject them to extreme strength tests.
- Now that you are seeing the middle board, remove the one screw anchoring it to the base, as seen in the image below. Now, the middle board and bottom board are connected to each other via pins and sockets, like a breadboard. Pull the middle board directly upwards to separate the middle (and upper board) away from the bottom board.
[metaslider id=”1977″]
Step 2. Solder wires to J11 headers & setup TTL Reader
- The earlier step gives you access to the middle board which has our J11 headers. But, the top side of the headers are covered by a metal/plastic sheet, which I had to break off (You can see a remaining grey piece of it in the images below). Here is a diagram of the pinout in my case (alexanderhenne’s repository had it mirrored, as noticed by StephanAAU).
[metaslider id=”1981″] - Using a soldering iron, flux and lead, solder three wires, one each to the RX, TX and GND terminals. If you have jumper wires, solder the male end (pin-like) to the J11 headers. If you need help with the soldering, watch this video.
- Now, you have to decide how you want to run these wires out of the router. If you just want to try this out one time, you could keep the housing compartment and the boards separated during installation. Then, you could remove the wires after installation and setup. If you want this to be permanent, you could do what I did. I drilled a hole on the top of the housing, as you can see in the images below. Then, I routed the cables from the underside of the middle board to the top board through the holes for the mini co-axial cables. If you have jumpers on the other side of you wires, make sure you have made a big enough hole. In this case, you will also have to route those cables one-by-one through the holes in the board. You can then glue the TTL reader to the top.
[metaslider id=”1987″] - Now that the wires are out of the router somehow, it’s time to solder/plug the wires into the TTL reader. The diagram below shows how it works – RX from router goes into TXD on the TTL reader, TX from router into RXD on the reader, while GND to GND. If you don’t have jumper wires, I recommend soldering these wires to the pin holes on the sides of the TTL reader, instead of the protruding pins towards the back of the reader (gives better stability, thanks Reo Au In). If you have jumper wires, just plug them into the protruding pins on the back accordingly. In either case, the TTL reader has marking specifying each header. So, make sure they are soldered/plugged appropriately.
[metaslider id=”1993″]
Step 3. Verify UART/Serial connection
- Run a USB cable from the TTL reader to your Windows machine. If your TTL reader requires a driver, this is the time to install it.
- Power the router and turn it on. At this stage, do not connect anything other than the Type-C USB power cable to the back of the router.
- Right click on Start and click on Device Manager.
- Expand Ports (COM & LPT).
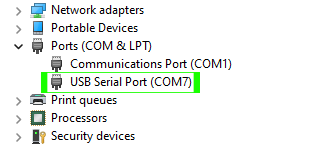
- Look for a device named, ‘USB Serial Port (COMX)‘ where X is a number, as seen in the image below. If you don’t see this, there is an issue with your setup. Recheck everything including the driver and try replugging everything. Once you have the device in your Device Manager, make a note of the number after COM. In my case, it is 7. If you have multiple USB serial devices, then reconnect the one for the router to get its exact COM port ID.
- On Windows, open Putty, click on the radio button named Serial, to shift to the Serial Mode.
- Under Serial Line, replace COM1 with yours, for example, COM7. Under Speed, change the default 9600 with 115200.
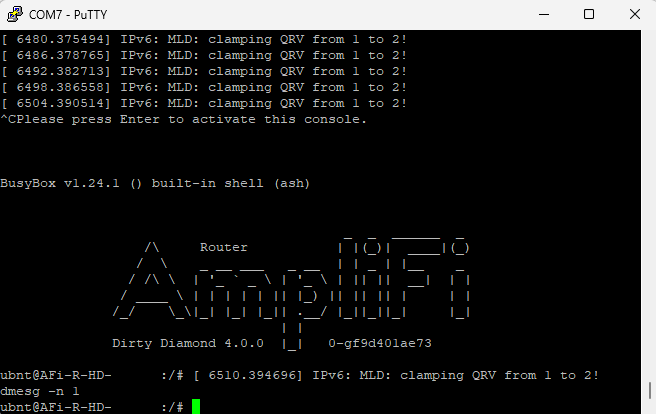
- If all goes well, you should see a terminal with dmesg output running continuously. Just to double check, click on the Putty window, and press Ctrl+C on your keyboard. Press Enter when it says “Please press Enter to activate this console.” This will drop you to the default Busybox Ash shell, as in the image below.
- To stop the dmesg output from printing into the terminal, type
dmesg -n 1and press Enter.
And you have completed part 1 of the mission.
Now, the next step is optional, but highly recommended, i.e., backing up the current firmware.
Part 2. Backup original Amplifi firmware & copy it to Windows
Having a backup, you can easily restore the original firmware along with the settings and configuration very easily. So, I highly recommend that you follow these steps to backup the firmware.
Step 1. Backup original Amplifi HD firmware
- On the Putty window, type
cat /proc/mtdand press Enter. You should see something like this:- - Look for the partition named ‘firmware‘ and make note of the device ID to its left. In my case, as you can see, it is mtd6.
- Now, type
cat /dev/mtd6 > /tmp/original-firmware.binand press Enter.
With that, you have successfully backed the firmware up to a file called original-firmware.bin.
Step 2. Disable Firewall temporarily
On your Windows system, it is recommended to disable firewall temporarily during the installation process. This is to avoid any potential clashes. Depending on whether you run a 3rd party Antivirus program or not, the steps may differ. Google is your friend here. The steps for disabling default firewall on Windows 10/11 are given below:-
- On Windows Search bar, search for “firewall” and click on Firewall & network protection.
- Check for the network which says ‘(active)‘ which in my case is Public network. Click on it.
- Under Microsoft Defender Firewall, toggle the switch to turn it off.
- Click on Yes on the UAC popup.
- Just to be safe, these steps can be repeated for Domain network and Private network as well.
Step 3. Install & setup OpenSSH Server on Windows
Now, there are multiple ways to install OpenSSH Server on Windows. But, newer versions seem to have an issue with Amplifi’s application which lets us copy the original firmware backup to our Windows machine. That is why I have decided to use an older version (v8.1.0.0p1-Beta). Let us see how we can set it up.
- On Windows, extract the contents of the downloaded OpenSSH-Win64.zip to C:/Program Files/. Rename the extracted folder from OpenSSH-Win64 to OpenSSH. Now, this folder should have several executables (.exe) and especially a file called install-sshd.ps1.
- Go to Search bar on Windows, type cmd. Right click on Command Prompt and click on Run as administrator.
- On the Command Prompt, type
cd C:/Program Files/OpenSSHand press Enter to change the directory to the OpenSSH folder. - Then, type
powershell.exe -ExecutionPolicy Bypass -File install-sshd.ps1and press Enter. - Once the installation is complete, check the status of SSH Server by typing
powershell.exe Get-Service -Name *ssh*and pressing Enter on the Command Prompt. It should say, Stopped. - Type
powershell.exe Start-Service sshdand press Enter. - Optionally, type
powershell.exe Set-Service -Name sshd -StartupType 'Automatic'and press Enter to automatically start SSH Server on every boot. This is only required if you will be moving files to and fro the router very frequently. - To check if the service is running, type
powershell.exe Get-Service -Name *ssh*again and press Enter on the Command Prompt. This time sshd should say Running.
Step 4. Copy backup firmware to Windows device
- Connect the router to Internet and connect a LAN cable from the router to your Windows machine.
- On Command Prompt, type whoami and press Enter. This will give you your Windows username. The username is the string after the first forward slash (\). In my case, that’s ps4linux. Make a note of it. Also make sure this user account has a sign-in password.
- Once you have internet on your Windows machine, type ipconfig on the Command Prompt and press Enter.
- In the output, make a note of the IPv4 address of your Ethernet adaptor. For example, in my case, it is
192.168.167.179. - Switch to the Putty window, type
scp /tmp/original-firmware.bin [email protected]:/C:/Users/ps4linux/Desktopand press Enter. Replace ps4linux with your username and also the IP with the one we noted in earlier step. This command will copy the backup firmware to your Desktop. Feel free to change the destination. - When it says, “Do you want to continue connecting?” type y and press Enter.
- When asked, provide your Windows sign-in password for the account and press Enter. This will copy the file to your Windows machine.
- Now, we need to verify the firmware file’s integrity (optional, but recommended to avoid faulty firmware files). On Putty, type
md5sum /tmp/original-firmware.binand press Enter. - Copy the 32 character hash key shown and open WinMD5 and paste it in the second blank.
- On WinMD5, click on Browse and choose the file – original-firmware.bin.
- Click on Verify. It should say Matched!
This means you are ready to install and setup OpenWrt on Amplifi HD. Let’s move to the next part.
Part 3. Install & setup OpenWrt on Amplifi HD
Step 1. Tftpboot OpenWrt on Amplifi HD
- Connect a LAN cable from your Windows device to Port 1 (labelled on the back) on the Amplifi router. Disconnect the cable from the Internet port on the router. Make sure only the Type-C USB power port on the back and LAN 1 are the only connected ports on the back of the router.
- On Windows, press on Win+R keys together to start Run.
- In the blank provided, type ncpa.cpl and press Enter. This will show the Network adaptors on our device.
- Right click on your Ethernet adaptor, and click on Properties.
- Click on Internet Protocol Version 4 (TCP/IPv4) and then click on Properties.
- Click on the radio button, which says, “Use the following IP address.”
- For IP address, type in
192.168.1.254. For subnet mask, type in255.255.255.0. When done, click on OK and close the window. - Extract the Amplifi HD OpenWrt firmware archive somewhere easily accessible. This will create a folder with 2 firmware (.bin) files.
- Open Tftpd64 on Windows. Click on Browse and point it to the folder which contains the 2 firmware files (the one we just extracted).
- Go to the Server interfaces dropdown and choose the one which says
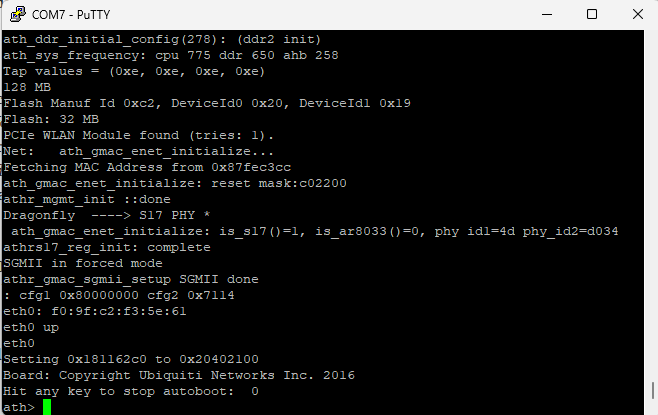
192.168.1.254. Keep Tftpd64 open. - On the Putty window, type reboot and press Enter. But, as soon as you press Enter, keep jamming any key on your keyboard, till Putty says
ath>, as you see in the image below. This means, you have successfully stopped autoboot.
- On Putty, type
tftpboot 0x83000000 amplifi-router-hd-initramfs-kernel.binand press Enter. This will start copying the firmware file from your PC to the router. - Once done, to temporarily boot the OpenWrt image, type
bootm 0x83000000on Putty and press Enter. - A minute or so later, when it has booted into OpenWrt, on the Putty window, press Ctrl+C on your keyboard. Press Enter when it says “Please press Enter to activate this console.” This will drop you to the default OpenWrt Ash shell, as in the image below.
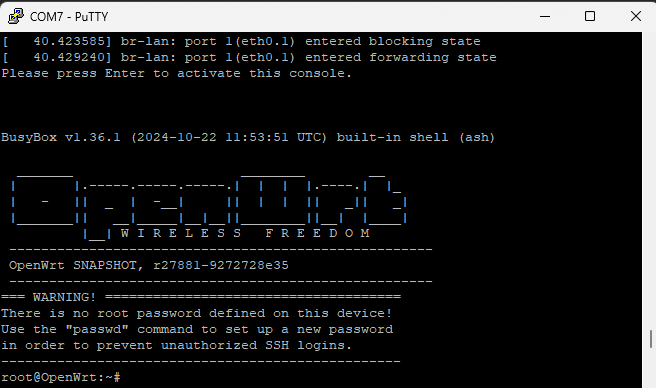
Now, this is a temporary OpenWrt boot, meaning, if you were to reboot at this point, you will be dropped into Amplifi’s original OS. Let’s make OpenWrt permanent on Amplifi HD.
Step 2. Install OpenWrt permanently on Amplifi HD
- Go to the folder containing the two OpenWrt firmware files. On the address bar, type
cmdand press Enter. - On the opened Command Prompt, type
scp -O amplifi-router-hd-squashfs-sysupgrade.bin [email protected]:/tmp/and press Enter. - When asked, “Are you sure you want to continue connecting,” type
yesand press Enter. This should copy the permanent OpenWrt installation image to the router. - To flash the image, switch to the Putty terminal, type
mtd write /tmp/amplifi-router-hd-squashfs-sysupgrade.bin firmwareand press Enter. This process might take a few minutes. Do NOT interrupt it. - Once complete, you will be dropped back to the shell. After that, type reboot and press Enter.
Voila! Now, you should have OpenWrt permanently on your Amplifi HD Router! But, this image doesn’t come with the Web Admin GUI. Let’ set that up and a few more things.
Step 3. Install Web Admin GUI & setup OpenWrt on Amplifi HD
- On Windows, press on Win+R keys together to start Run.
- In the blank provided, type ncpa.cpl and press Enter. This will show the Network adaptors on our device.
- Right click on your Ethernet adaptor, and click on Properties.
- Click on Internet Protocol Version 4 (TCP/IPv4) and then click on Properties.
- Click on the radio button, which says, “Obtain an IP address automatically.” When done, click on OK and close the window.
- Connect Internet cable to the back of the router and wait for internet to initialise.
- On the Putty window, press Ctrl+C on your keyboard. Press Enter when it says “Please press Enter to activate this console.“
- Once in the shell, type
opkg updateand press Enter. - Once complete, type
opkg install luciand press Enter. - After successful installation, on your Windows browser, go to http://192.168.1.1 to access the Web Admin GUI.
If you’d like to encrypt the Web Admin GUI or add languages, check this article. Also, the first time you login to the web GUI, it will ask you to set a root password. Please set it up before you proceed to make any further customisation. Also note that Wireless (WiFi) is disabled by default on OpenWrt. You can enable it using the Web Admin GUI.
Also, do not forget to enable the firewall on Windows now.
Troubleshooting
OpenWrt doesn’t boot
StephanAAU says, he had trouble booting OpenWrt. And, he has shared the steps to fix this on his Gist (Step 3) and believes it is an issue with the uboot parameters. Here are the steps to be followed:-
- If you have access to shell, type
rebootand press Enter on Putty, following by jamming of a key on the keyboard to stop auto boot. If not, then power off the router by unplugging the adaptor, connect to Putty using the COM port, as earlier. Then, turn the router on. While it boots, click on the Putty window and jam a key on the keyboard, till it stops auto boot. - On Putty, type
setenv customboot 'bootm bf070000'and press Enter. - Type
setenv bootcmd 'run ubntappinit customboot'and press Enter. - Type
saveenvand press Enter. - Type
resetand press Enter.
‘Warning: Remote host identification changed’ on scp from Windows
If you do face this error on Windows Command Prompt, when trying the scp command, just type ssh-keygen -R 192.168.1.1 on the Command Prompt and Enter. Then, try the scp command again.
Conclusion
I am not an expert at soldering, but, I love tinkering. But, if you are a complete beginner at soldering, I’d recommend you practise little beforehand or take help of an expert. Anyways, if you do face any issues with this tutorial, leave a comment below and I will get back to you. Images or screenshots do help when debugging. So, please post them with your queries.
Hello Sir,
Great work! I think AmpliFi is nearing the end of it’s product life, at least for HD. Given this, before trying this myself there’s some key questions:
– What about Mesh points? Will the 2 mesh points still ‘mesh’ to the OpenWRT flashed AmpliFi router like normal (using 5GHz backbone).
– Will this flash allow for key features that were missing, such VLAN aware SSID? Currently there’s no VLAN options, does the OpenWRT administered device now add this?
– You mention a follow up video on how to revert the firmware / flash it back to original AmpliFi. This is obviously very important for most people before they attempt wiping their device(s). It doesn’t need to be a video, a write up is fine just confirming a full restore works and the steps to take.
Thank you kindly, much appreciated!