
Deepseek is all over the news, some even hailing it as an extremely worthy OpenAI competitor. And, I am sure, many of you would love to try it out. So, here’s a beginner friendly tutorial to setup Deepseek R1 AI locally on your PC. Yes, you heard right! By the end of this tutorial, you will have offline Deepseek R1 AI chat assistant on your PC. Not only Deepseek, but, this tutorial will explain the steps to setup Ollama AI models locally for offline usage.
Using this method, you can also largely alleviate the privacy concerns regarding the usage of some AI models, especially those originating from China. This is because many of the Ollama-based models have been open sourced and are available for download and use, for the general public. This is what will help us run AI models on a PC offline. And, using Open WebUI, you can have a ChatGPT like page.
Before we begin, let me quickly introduce you to the models and applications that we will be using to achieve our target.
What is Deepseek?
Well, why not let Deepseek R1 (7B) running locally on my PC answer that for you. Here’s what it returned when I posed the question, “What is Deepseek AI?”:-
DeepSeek AI is an advanced intelligence platform developed by DeepSeek Artificial Intelligence Co., Ltd., founded in 2023. The company aims to advance artificial intelligence technology, with a focus on making significant contributions to the development of AGI (Artificial General Intelligence), as well as improving human productivity and quality of life through intelligent solutions.
DeepSeek AI’s primary mission is to research and develop cutting-edge AI technologies that can solve complex problems across industries. The company leverages its expertise in areas such as machine learning, natural language processing, computer vision, and robotics to create innovative tools and systems. Its goal is to unlock the full potential of AI to drive progress in various sectors.
What is Ollama?
Now, this time, to get an answer that wasn’t misleading, I had to get the information directly from ollama.com. Being an intelligent generative model, Deepseek tried to connect it to the previous conversation and tried to tell me that Ollama was developed by Deepseek, which is not the case. So, the website explains that Ollama is a tool to help you:-
Get up and running with large language models.
It’s nothing more, nothing less!
Anyways, we are going to use the useful Ollama library to run our AI models efficiently and with ease.
How to run Deepseek R1 locally on your PC?
Let us begin with the requirements.
Requirements
- Windows, Linux or Mac machine (This tutorial will use Ubuntu. I recommend Linux or Mac)
- 16GB RAM (Recommended, but you can try on lesser amount of RAM as well, but, it will be really slow)
That covers the major requirements. Now, let us get into the tutorial. For convenience, I have broken up the tutorial into a few steps.
Step 1. Install Ollama on PC
- On a Linux machine, open a terminal.
- Type
curl -fsSL https://ollama.com/install.sh | shand press Enter. - Once, the process is completed, type
ollama serve &and press Enter (The&is not a typo). - To check if Ollama is running properly, run
ollama -von the terminal and see if it displays version information properly and doesn’t say “Warning: could not connect to a running Ollama instance“.
That’s it! This will install Ollama on your PC. For those on Windows and Mac, the installation instructions are available on the download page.
Step 2. Download and setup AI LLM models on Ollama
- Go the Ollama models page here.
- Since we are going to run Deepseek R1 (7B) on Ollama, I can check out its page.
- Now, on the page, under Distilled models, you will find various models of Deepseek R1, for example, 7b, 8b, etc. I will choose 7b here. The ‘b‘ stands for the parameters on the model. So, 7b has 7 million parameters. As you go higher, the parameters and thus, the RAM and CPU consumption increase. So, choose your modeld epending on your PC’s specs.
- Once you have decided on the model, get the pull command from the page. For example, for distilled Deepseek R1 7B, it is
ollama run deepseek-r1:7b. Run the command on a terminal and let it finish. - This will drop you into a chat prompt on the terminal. You are now ready to ask it questions. But, I’d rather setup Open WebUI for better access of the models next. To do that, on the terminal, type
/byeand press Enter. You will then have exited from the terminal-based chat box.
Step 3. Setup Open WebUI with Ollama for a ChatGPT-style assistant
- On Ubuntu, open a terminal and type
sudo apt update && sudo apt install -y python3 python3-dev python3-pip python-is-python3 pipx nano ffmpegand press Enter. For other OSes, Google for steps to install and setup Python. - Now, type
pipx install open-webuiand press Enter. The installation will take some time, and if you have a slow internet connection, it will take a long time. So, in most cases, the terminal isn’t frozen. - After the installation is complete, type
pwdand press Enter. This should return /home/user, where user is your username. If it doesn’t, typecd $HOMEand press Enter. - Type
nano .bashrcand press Enter. This will open the file in a text editor. Scroll to the bottom of the page and paste this –export PATH=$PATH:/home/user/.local/bin, after replacing user with your username. Now, press Ctrl+S and then, Ctrl+X to save and exit. - Type
source .bashrcand press Enter. With that, you are ready to run Open WebUI with Ollama and use Deepseek on your PC. - To run Open WebUI, just type
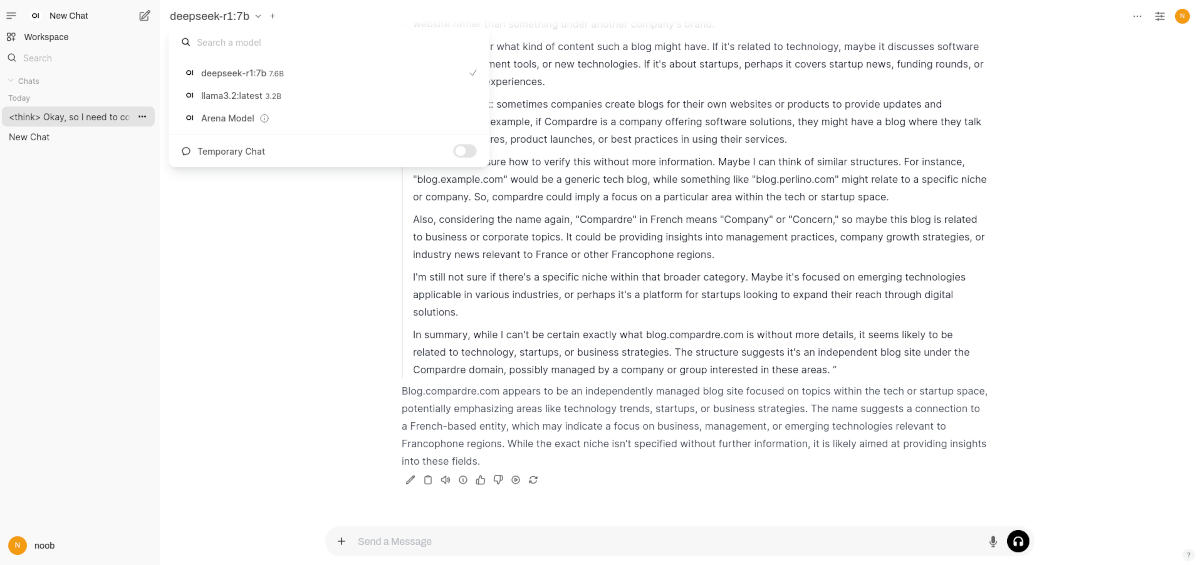
open-webui serveand press Enter. If successful, it will output the URL (with the port the UI is running on), which by default is http://0.0.0.0:8080 or http://localhost:8080. Access this URL on a web browser on your PC and you will be greeted to the welcome page. - Provide your email and choose and password. Remember these, as we will use it to login after restarts. Once done, you should have access to the UI for the chat, like in the image below. Make sure Deepseek or your model is selected on the top left and get started!
Additional setup for local Ollama installation with Open WebUI
With the above steps, you would have a successful installation of an AI assistant running offline on your PC. If you want to go advanced, here are a few things you could try.
Run Ollama with Open WebUI after restart?
If you would like to run the AI setup manually after every restart, these are the steps to follow:-
- Open a terminal, type
ollama serve &and press Enter. - Then, type
open-webui serveand press Enter.
How to use AMD/NVIDIA GPU for Ollama?
By default, chances are, that Ollama won’t use your GPU for the processing, especially, if you haven’t run these steps before. A few more steps might be require for that. Here are the steps to follow.
Setup AMD GPU for Ollama
- Open a terminal, type
curl -L https://ollama.com/download/ollama-linux-amd64-rocm.tgz -o ollama-linux-amd64-rocm.tgzand press Enter. - Once the download is complete, to extract, type
sudo tar -C /usr -xzf ollama-linux-amd64-rocm.tgzand press Enter.
Setup NVIDIA GPU for Ollama
This will only work if your NVIDIA GPU supports CUDA. You can Google for ways to check. If it does, download and install the CUDA Toolkit from here. To check if the drivers have been installed properly, type nvidia-smi and press Enter. This should output information on your GPU.
How to add more AI models to Ollama and Open WebUI?
To add more models, just go to the Ollama Models page and repeat Step 2 from above. On the Web UI, you can switch between various models on the top left, as you see in the image above.
How to change Open WebUI port from 8080?
This is important, because, some apps on your PC might already be using port 8080 and thus, a conflict might ensue. You can switch to any other available free port. Follow these instructions to change Open WebUI’s default port (8080):-
- Open a terminal.
- Type
open-webui serve --port 7090and press Enter. Replace 7090 with any other value or port free on your PC.
Now, you can access the Web UI on that specified port and not on 8080.
RAM running out? Swap space could fix it
In some cases, you will see that your PC freezes as the model will use up all the RAM. In this case, setup swap space (the steps aren’t exclusive to PS4).
Conclusion
Depending on your PC and its specs, you might run into various errors. If you do, just leave a comment below and I will get back to you.
Leave a Reply